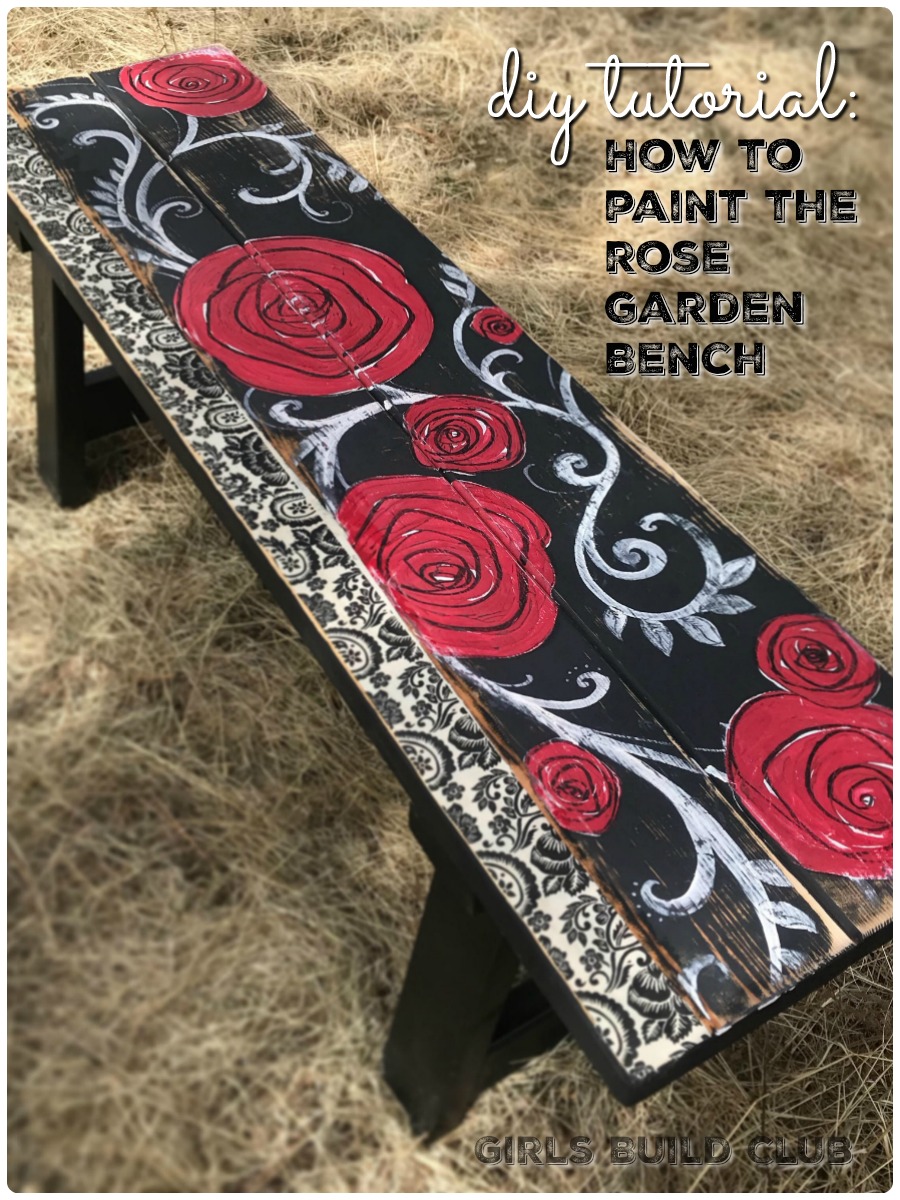
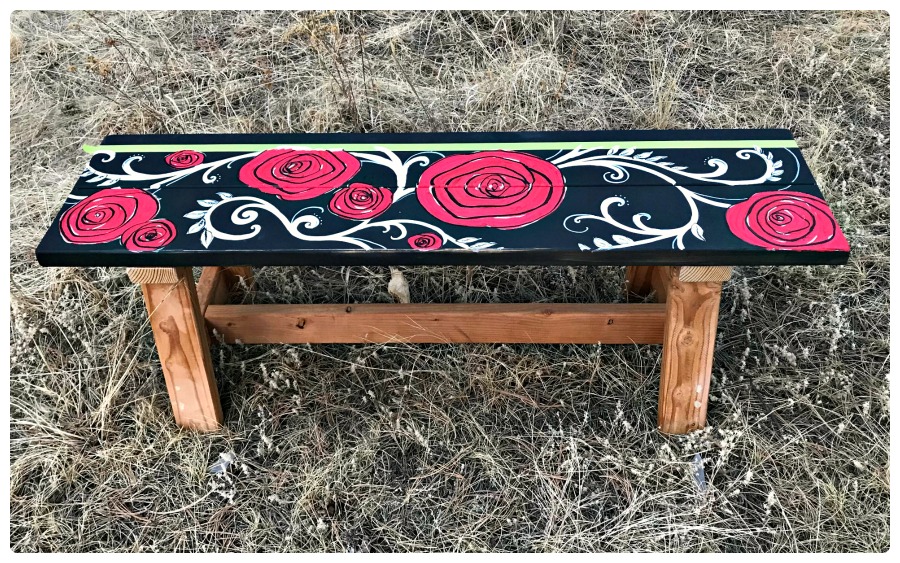
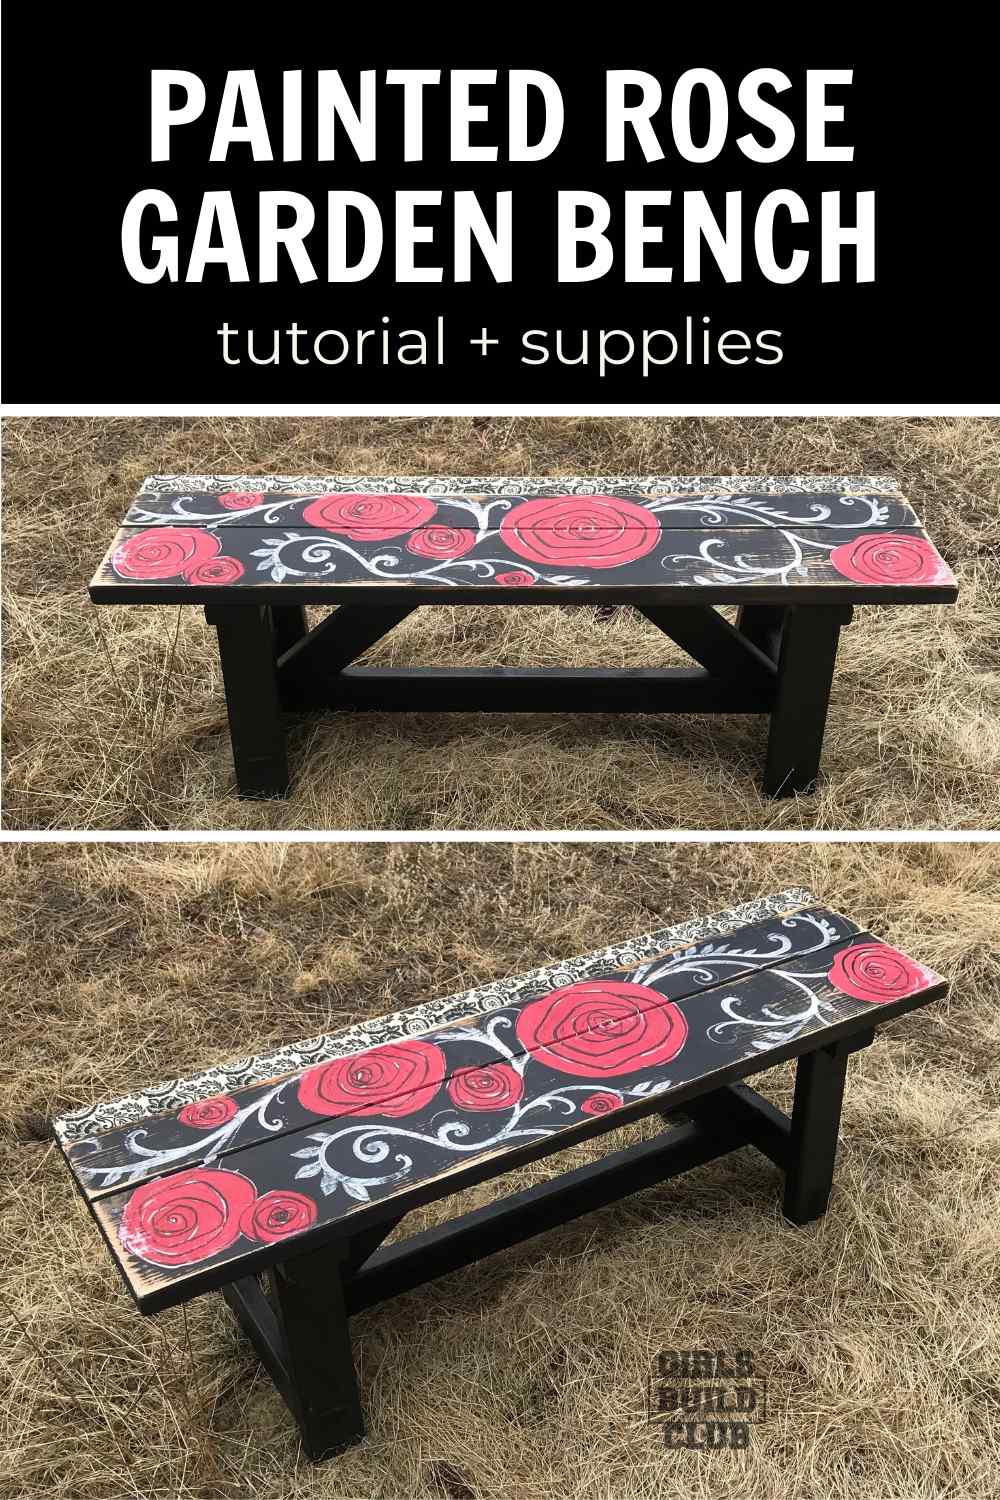
Introducing the Rose Garden Bench
This tutorial will describe how to hand-paint and decoupage this rose garden design.
OVERVIEW
Difficulty level: Medium
Time: 4 hours
Cost: $30
I’m all about those stunning pieces that just grab your attention from the moment you lay eyes on it. In fact, I may be a little too into statement pieces. My home is going to become a hodge podge of color and patterns. But hey, that’s me, and that’s what I love – color and patterns, so why not go with it? 🙂
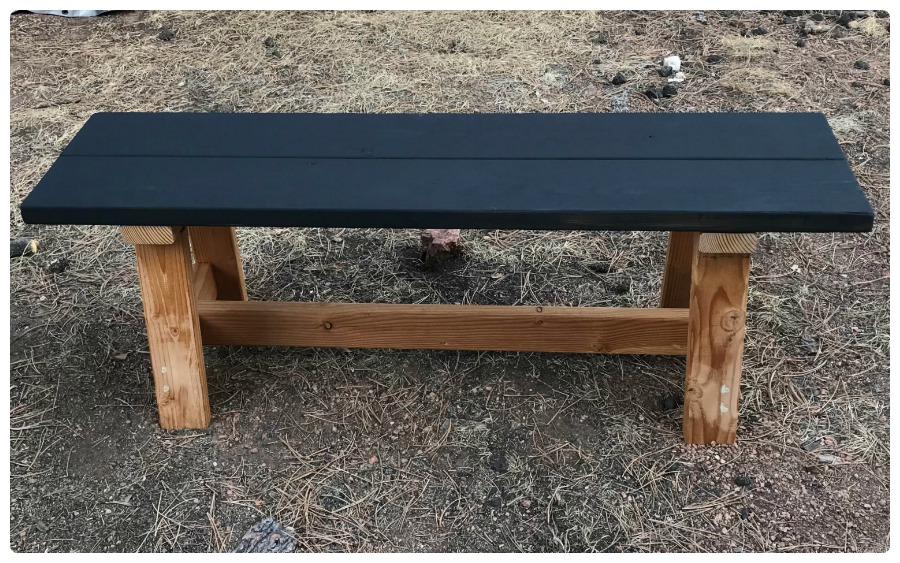
This is another bench I built from Ana White’s Providence Bench plans. It’s pretty easy to build – it was the first piece of furniture I ever built, come to think of it. And now that I have it down, I can build these benches in a couple hours. Which is pretty fast considering it used to take me several days.
If you want to build your bench from scratch then more power to you. You’ll probably feel a lot more satisfied at the end of the project, too! Or if that’s not your thing or don’t have the tools, etc, then you can always use this tutorial to apply the same hand painted design to a bench you bought or a chair or a table. Whatever you can think of!
So to begin with, get your supplies gathered. Here’s what you’ll need:
SUPPLIES
Some of these supplies have affiliate links. When you purchase from the link I’ll receive a small commission and this helps me pay for blog expenses. Listed below are the exact products I used to do this bench design:
- Painters tape – I get the green stuff for concrete/stucco/brick because it’s extra sticky.
- Americana craft paint – in black, white, tuscan red
- Elmer’s Painters Pens
– in black
- Decorative paper- I got mine at Paper Source for $5.95 but it seems they aren’t carrying this pattern anymore. 🙁
- Sandpaper – 100 grit
- Cheap paint brushes
- Mod Podge Matte decoupage glue
- Hand held squ
- Minwax Polycrylic
I find that I work better and focus better when I’m working in a clean tidy area where I have space to work freely. I hate having supplies lying around from past projects in my space where I’m currently working. Plus it helps to only have what you’ll need for this project, right in front of you, so you don’t have to go looking for it.
Let’s start painting!
Okay, we’ll start by laying down a black base coat. Paint the entire bench top and sides black. You don’t have to paint the underside of the bench seat black but it might help it feel more finished.
 I like to try to plan out my design before I start painting. I say “try” because sometimes I get too impatient for the planning and just want to dive right in. The problem is, I have this amazing image in my head, and it’s NEVER as easy to bring it to life as I expect. So take the time to sketch it out, trust me! But after just telling you to plan it out, even when I do sketch out a design, I rarely end up following it. But it still helps! It helps me figure out the placement and balance of the design even if I do improvise along the way.
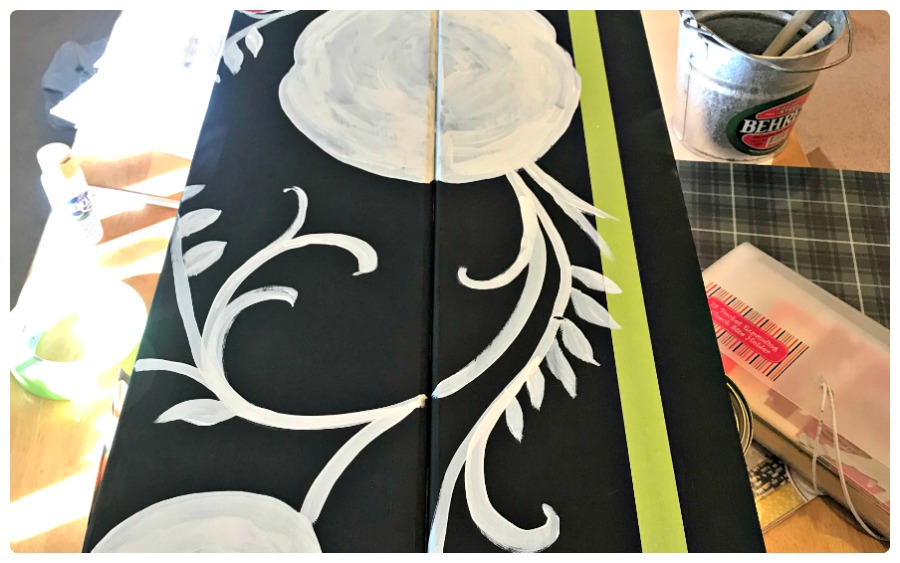
After doing a little sketch, I stuck down a piece of painters tape along a long edge of the bench. This will keep me from painting over the line and leave us a little blank border to decoupage within.
Then I outlined the design that I sketched out with a white pencil on the black bench top.
Next I started painting lumpy-edged white circles around the bench top. These will eventually be the red roses. I didn’t want them perfectly round (because no flower is) so I purposely made them different shapes but they were generally round. As I painted the white lumpy circles, I brushed it on in circular motions, going with the shape of each rose.
Once I had all the white roses placed, I went back and added the vines and filigree details.
Sometimes I look back at this stage where it was all white roses and white vine and wonder if it would have been cool to keep it just like that! But on we go…
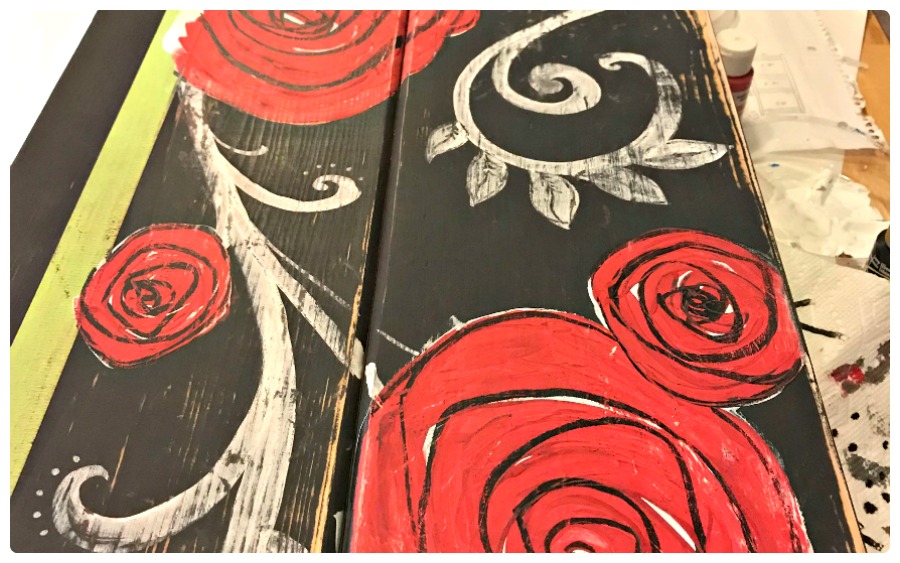
Okay, now that you just got done painting all the white roses, you’re going to paint over them with red! What a waste of time, right?! Well, there are a couple reasons why I did it this way. I wanted some white bits to show so that it looked almost like a screen printed design – imperfectly perfect. And I knew I’d be distressing it and wanted the layers to show through when I sanded it down. Layers make designs look complex and dimensional. So that’s why we are painting over the white roses. Sound good?
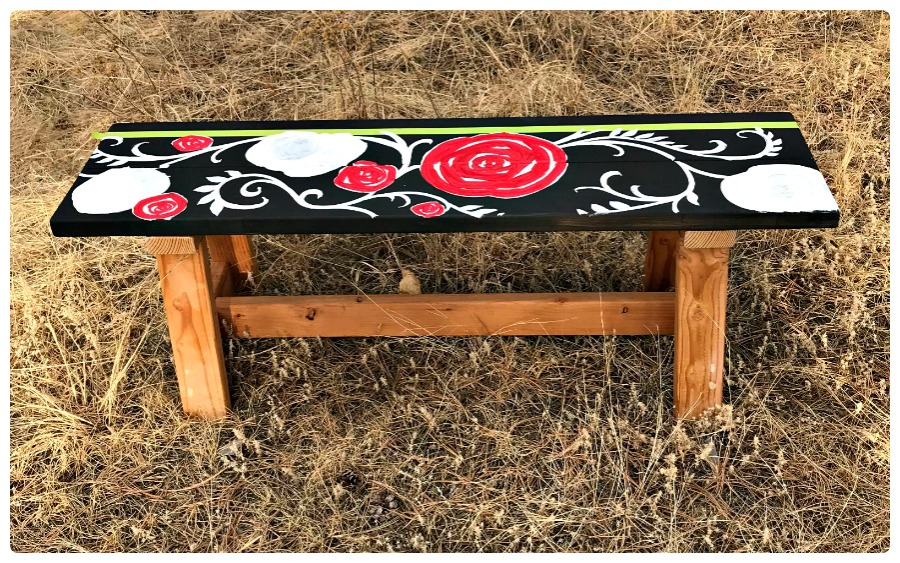
Above you can see how I painted the red in a messy spiral shape and left little bits of white showing. Keep painting until you’ve filled in all the white roses with messy red spirals.
Next I went over the red roses with the black paint pen and drew in more messy spirals. We will also go over the little filigree leaves and add some lines for veins. It’s really starting to come together at this point!
We are getting really close to being finished! At this point, I took off the tape and sanded down all the hand-painted portion. I like distressing designs because it softens them and hides mistakes. I also just love the well worn look of a loved piece. So here it is after I did some sanding:
My husband really loved the red roses and when he saw that I had sanded it down, he was so disappointed he said, “I hate it!”. Why did you sand it? I could almost see tears welling up in his eyes. 😉 The next day he came in with fresh eyes and was totally in-love with it all over again. And I really don’t think he was faking it. So whether you sand it down or not is totally up to you! But I love the distressed look.
When I sanded it down, I did a gentle sanding all over the bench, and then I did a lot heavier sanding on the edges and ends of the bench. The edges and ends are where it would naturally get a lot of wear and tear so I focused on those.
The painting part is done!
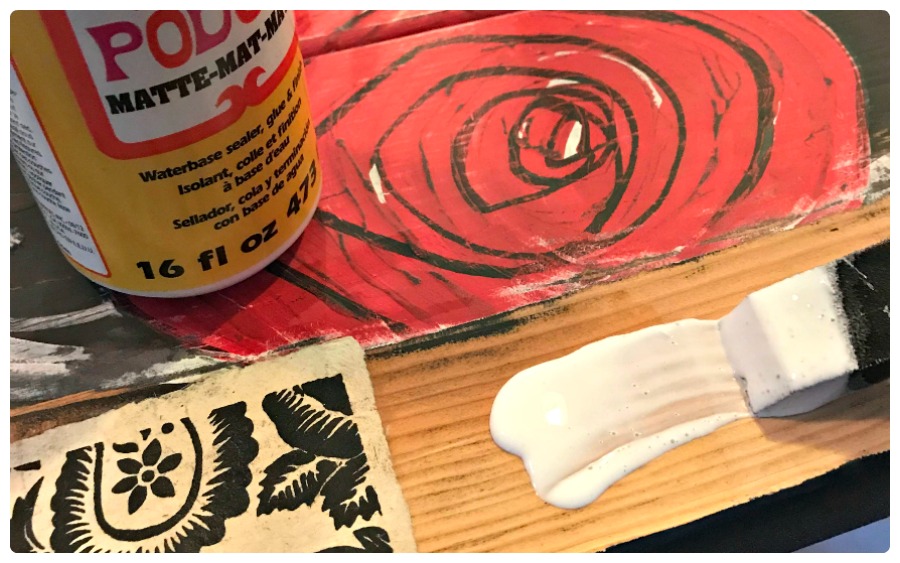
Now It’s Time To Decoupage
Decoupaging can have a bit of a learning curve when you are first starting out. If you want to, you can practice on some scrap wood or cardboard until you feel comfortable with it.
First I cut my paper to size. I did three strips end to end for this bench because the bench was so much longer than the paper I was using.
Next I laid down a good coating of modge podge glue. I spread it out evenly and laid down the paper on the modge podge.
Using my squeegee I swept from end to end and side to side to remove excess glue and air bubbles.

It’s okay if the glue squeezes out the sides. You can wipe it up with a damp rag.
That’s all there is to it! The trick and difficulty comes from using the right amount of modge podge glue, and laying the paper down right the first time because it sometimes it really sticks and you can’t readjust it. But usually you can readjust if you do it within the first few seconds.
I put a coat of modge podge on top of the paper as well. It seals the paper so that when we coat it with polyurethane the paper won’t absorb it unevenly and look blotchy.
Finishing Steps
Now all we have left is to apply a clear finish, like polyurethane, to seal it all up and protect all our hard work. You can use a spray poly, brush-on poly, or even wipe-on poly. Whatever you prefer! If you use oil based poly it will stink pretty bad for several hours and take longer to dry than water-based. Plus, you have to use mineral spirits to clean up your brushes and hands.
I always do two to four coats of poly to get a solid, even finish that won’t wear off quickly with lots of use.
Okay, NOW we are done! P.S. I painted the base black, too:
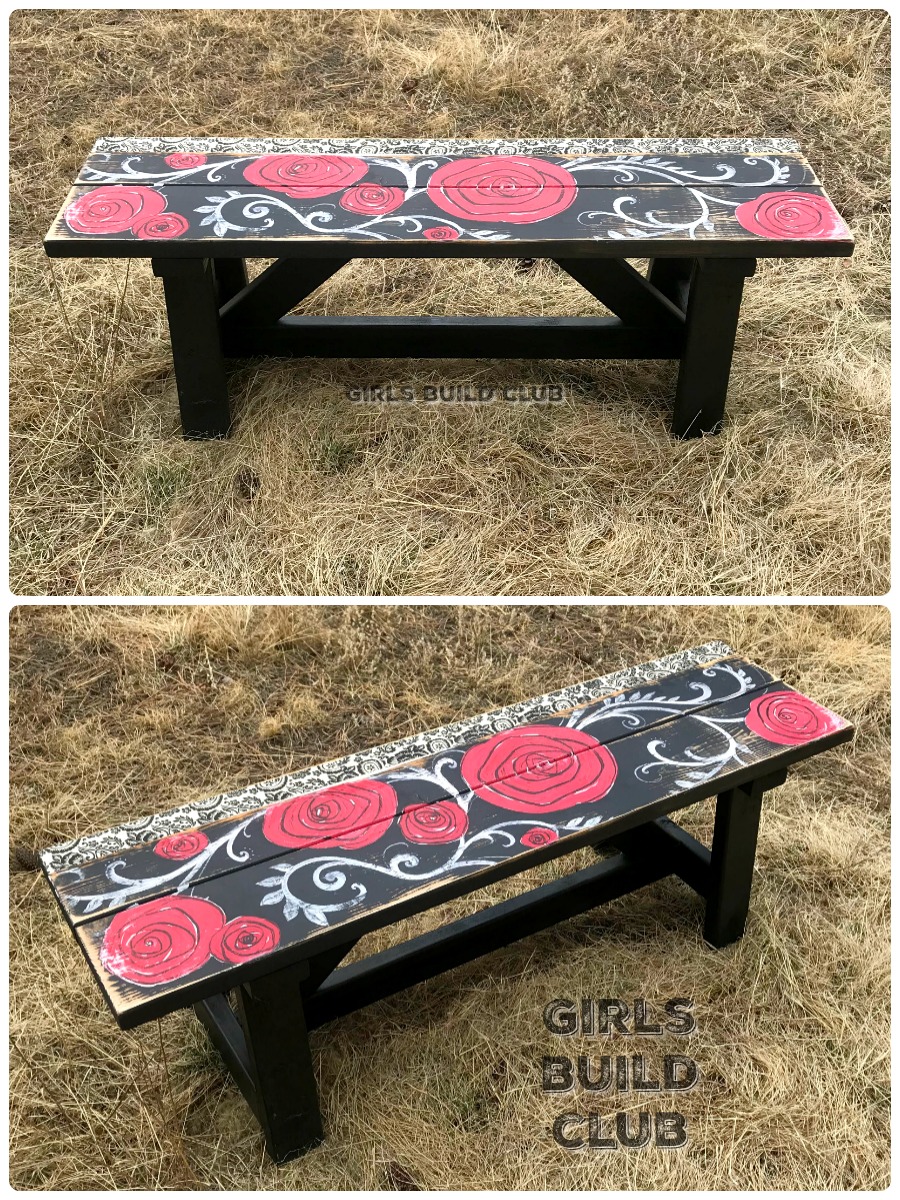
Looking at these photos, one thing stands out to me – the black base is all perfectly solid black, while the bench seat is very distressed. I guess I’m not finished after all. I need to go sand the base edges so it all looks more congruous.
As always, feel free to post photos of your version of this design in the comments below. I’d love to see what you’ve been up to.
If you liked this project, sign up for the newsletter below. You’ll be the first to know about new project posts!
Now go make something awesome!
I like the bench and plan to try this project.
Thank you, Shelly! I hope you have fun with it. I’d love to see how it turns out. 🙂
Hi I think you did a great job on this project but I have to say that gluing the wallpaper onto the bench IS NOT decoupage. Decoupage is an intricate and difficult art form. The papers applied are cut out, like the flowers on your bench if decoupage would have been CUT OUT. Using the word in the way you do . . . well wallpapering would then be decoupage!
I see what you mean, Emily. Thanks for stopping and thanks for the feedback! 🙂
Beautiful, Love it
Thanks, Dana! Appreciate it!
Great ideas! May I ask Where’s the site that shows how u build the bench? I’d love to learn that!
Thanks, Jenny! I’ve linked the bench build plans in the beginning of the post. 🙂 Good luck and have fun!
Great job and thanks for the easy to follow instructions!
Thank you so much, Shann! Glad you enjoyed it. Please share photos if you end up trying it out. 🙂
LOve the bench its gorgeous
Thanks, Ann! So nice of you to say so. 🙂